Thursday, September 6, 2018

Converged AIoT Kit Operating Notes

Substitute operating procedures are not discussed in this general chapter. They will be discussed in individual notes on topics.

AIoT Use Yolo Model With Non-yielding Process

MicroPython is well-known for its unpredictable memory garbage collection schedule, which slows down the mission process and, even after disabling garbage collection, is 10-100 times slower than binary executables, making it unsuitable for production. The options in the Zero form factor or smaller, accounting for weight, are as follows. Gray highlights a trouble spot with possible workarounds.
 
After burning the Radxa https://github.com/radxa-build/radxa-a733/releases R6 image with Chromebook or any Linux onto a USB-adapted SD card, before using it on the AI computer, modify the boot partition "before.txt"'s WIFI section's SSID/password, and find the AI computer's IP address by scanning with this bash command (change the IP network part of the address accordingly):
$ for i in {1..255}; do ping -W1 -c1 10.236.101.$i; done
. A WIFI router may change the first 3 octets of a host machine frequently, but the 4th octet $i generally stays the same for the same host machine's MAC address. So, once you figure out the AI computer's 4th octet $ i$, you will not need to run the scan again because your laptop, which connects to the same WIFI router, readily shows you the first 3 octets.

Use SSH to operate the AI computer. Then, enabling the camera:
radxa@radxa-cubie-a7z:~$ sudo rsetup
$ sudo reboot
 
$ sudo apt update
$ # copy below to a text file and concatenate to a single line before executing
$ sudo apt install gstreamer1.0-tools 
gstreamer1.0-plugins-base gstreamer1.0-plugins-good 
gstreamer1.0-plugins-bad  gstreamer1.0-plugins-ugly 
v4l-utils libgstreamer1.0-dev gstreamer1.0-plugins-base-apps gstreamer1.0-rtsp 

We need libOmxVenc.so/libOmxVdec.so to work with Allwinner's proprietary VPU hardware-accelerated h264 encoding/decoding kernel driver cedarc: 
$ wget https://github.com/radxa/allwininer-debian/raw/7f592b79a85cb7b5ef86dabaf2016013b85a8d4d/packages/arm64/libcedarc/libcedarc-dev_2.0.0_arm64.deb 
$ sudo dpkg -i libcedarc-dev_2.0.0_arm64.deb
$ sudo ldconfig
$ dpkg -l | grep cedarc
$ reboot

Actual application run uses converged_aiot.tar.gz (200MB download, 97% of the data size is YOLO models and YOLO testing/utility tools), which utilizes GStreamer's shared object .so libraries to transmit real time video:
~/converged_aiot$ source make.sh # takes about 20 seconds to build converged_aiot
~/converged_aiot$ sudo ./converged_aiot -e v4l2src device=/dev/video1 en-awisp=1 en-largemode=1 do-timestamp=true ! video/x-raw,format=NV12,width=1280,height=720,framerate=20/1 ! omxh264videoenc control-rate=2 target-bitrate=4000000 ! h264parse ! rtph264pay ! gdppay ! udpsink host = 10.96.212.190 port=9000 sync=false > /dev/null

The converged_aiot executable is a C++ program converted from the C program gst-launch.c infused with the christianrauch/msp C++ library, which controls Betaflight, all purely written by Claude Code AI. The pipeline is made of 7 segments (red->orange->yellow->green->cyan->blue->purple):
Input: v4l2src eliminates the earlier Raspberry Pi models' two OS processes, I/O piping, and process-switching delays. The en-awisp turns on hardware wide dynamic range, the en-largemode turns on maximum photo sensor utilization, the do-timestamp enables more accurate time stamps with the SBC's system clock so that times between ground station and the craft don't drift apart and induce latency after hours of streaming, all verified that turning them off does not reduce latency.
Matchup: x-raw means the lowest delay with the parallel MIPI CSI ribbon cable. Do not be alarmed by the Radxa camera spec RAW10/RAW12 CMOS photo current value data mismatching the "NV12" image planar format. The VPU "secretly" converts RAW data from the MIPI CSI connector into NV12 color-space YUV planar data onto system SDRAM. This is also why a generic USB camera for Orange Pi Zero 3W has much more delay than the Radxa system. A generic USB camera converts RAW data to color space data (but not planar) in YUY format (Y, not V) in system SDRAM. Then YUY needs to be converted to YUV all in software, community support abandons Orange Pi's image and instead uses Radxa's image as a impossible solution. In addition, the next step h264 encoding hardware driver is also missing in Orange Pi's image.
Video compressed data: Allwinner proprietary plugin code omxh264videoenc connects the gst process with the kernel module cedarc to use VPU hardware acceleration. The control-rate=2 is known to elimiate B frames that adds latency. Split the video stream into fragments of pictures. RTP header Codec h264 or h265 preamble at the very beginning of the stream.
UDP/IP heade sync=false  is verified to reduce 40ms latency r

Viewing it by reverse the pipeline processes (purle->blue->cyan->green->yellow->orange->red) 
$ sudo apt install gstreamer1.0-vaapi intel-media-va-driver-non-free
$ sudo gst-launch-1.0 udpsrc port=9000 ! gdpdepay ! rtph264depay ! h264parse ! vaapih264dec low-latency=true ! vaapipostproc ! autovideosink sync=false

The Intel vaapih264dec decoder requires the low-latency=true setting to avoid the "standard" store-and-process-in-batch behavior, which is stuttering in real-time viewing. The glass-to-router-to-glass latency is about 130ms (the Wi-Fi router is known to add 50ms relay delay), as pictured here, here, and here

The error message complaining about ttyACM0 missing means no Betaflight is connected for autonomous navigation, which does not impair the video transmission. The receiver needs to start before the sender starts to catch the gdppay preamble (codec/video dimension info). This setup already allows the video connection to reconnect and also allows the sender to crash and restart, because the receiver only needs to know the codec/video dimensions once to handle all subsequent restarted video streams. TODO: configure the ground station itself as the Wi-Fi AP and tune the UNIX process to save 50ms of delay.

It doesn't improve delay with a queue in the pipeline, increased framerate, smaller resolution, and a heatsink. Actually, the missing "control-rate=2" added B-frames and 50ms delay, and the missing sync=false added another 40ms delay, as tested below. This test also showed that the software avdec_h264 is as fast as Intel's hardware decoder vaapih264dec when not processing 4K video, which is well known.


The alternative AIY Vision kit with Raspberry Pi image aiyprojects-2021-04-02.img allows setting up a Raspberry Pi without any HDMI monitor or FTDI terminal connection. Instead, an Android app Google AIY Projects gives your WIFI hotspot's password to the Raspberry Pi with Vision Bonnet board, as shown in the following screenshots.
Once the Raspberry Pi Linux system receives the WIFI password, it connects to the WIFI hotspot that assigns a DHCP IP address to the Linux system. From then on, the Raspberry Pi Linux system's pre-running SSH server accepts connection from any computer on the WIFI network.

The vision Bonnet needs to be removed to keep the takeoff weight below 250 grams.

Raspberry Pi's raspivid runs hardware-accelerated h264 encoding. And Raspberry Pi, by default, auto-log in to the "pi" user account, which invokes the "bashprofile" program. The setup in the craft follows (the AIY Linux system image has a default video transmission service, "joy_detection_demo", incompatible with the 1.6-gram, 160-degree FOV camera, and needs to be disabled). 
pi@raspberrypi:~$ sudo apt install gstreamer1.0-tools
pi@raspberrypi:~$ sudo systemctl disable joy_detection_demo
pi@raspberrypi:~$ cat .bash_profile
sh /home/pi/stream.sh
pi@raspberrypi:~$ cat /home/pi/stream.sh
raspivid -t 0 -rot 180 -b 1700000 -w 640 -h 360 -o - | gst-launch-1.0 -v fdsrc !  'video/x-h264,width=640,height=360'  ! h264parse ! queue ! rtph264pay config-interval=1 pt=96 ! gdppay ! udpsink host = 192.168.1.1 port=9000
pi@raspberrypi:~$

Alternative to gst-launch autovideosink app is Android's Raspberry Pi Camera Viewer by BigDotSoftware
The app in Android above is the setup, with the Android phone as the WiFi hotspot, itself at IP address 192.168.1.1, as the example, which is the target of h264 video streaming.
The Viewer app must start receiving the video data stream before the video transmission starts because the app can not determine the video stream's frame positions in the middle of the stream. The app has an implied gdpdepay that determines the positions of the codec frames using the gdppay data at the beginning of the stream. In the video, the Viewer app starts at 0:02, and you can hear the craft powering up at 0:04 with ESC's beeping sequence. The receiving of the video data stream starts at 0:09 before video data transmission starts at 0:48. 
This video also reveals the landing process with a line of sight, heading away from the pilot as it descends. 


So, what is the fuss with VLC that we can not use it? The fuss with VLC is that it is a fuss. VLC is a GUI-oriented application well-suited to Android and other highly GUI-focused environments. It watches FFmpeg broadcasting using an SDP file (generated by FFmpeg) that contains codec parameters out of the box on Android, but the parameters for optimizing delay and buffering characteristics are buried in the GUI, not easily specified as in terminal/bash scripts. And VLC does not work on general Linux computers. The protocol for communicating codec parameters is a different paradigm from that used by gst-launch in GStreamer, so VLC cannot play gst-launch videos. VLC is stuck with FFmpeg broadcasting, and FFmpeg hardware-acceleration components are not supported by hardware vendors.

So why mute FFmpeg? FFmpeg is indeed a muting software design because it treats all streaming input/output/codec/conversion as independent parameters common in GNU free software, rather than the linear organization by processing sequence afforded by gst-launch in GStreamer. The linear organization by processing sequence is the correct, prominent design. FFmpeg is still useful for non-customized, open-source, pure software input/output/codec/conversion. And without VLC's GUI, FFmpeg can capture and stream 640x480 videos and play them back with about 2.2 seconds of delay, more than 1 second faster than VLC. Using VLC to watch a 640x480 video from FFmpeg has about 3.5 seconds of delay, pictured below. All these multi-second latencies preclude them from real-time applications.

So, what is the fuss about OpenIPC SSC338Q Soc that is 50ms faster? The answer is that it is not a fuss because SSC338Q has zero copies of YUV data for system SDRAM, which GStreamer/gst-launch relies on. Everything is hardware-specialized; hence, GStreamer/gst-launch is not supported.  

Avionics Computer With Stabilization Precedence In Air: The Only Solution

The racing drone avionics computer software is 2025's betaflight_4.5.2_STM32F7X2_HGLRCF722_f3b67204.hex. The configuration is dump_all_converged_AIoT_HGLRCF722_4pin.txt or dump_all_converged_AIoT_HGLRCF722_6pin, depending on the avionics computer hardware version, even though there is only one avionics software. The Configurator doesn't need to be installed; it runs online on a Chrome browser, and Chromebooks have the correct USB port permission out of the box.
The avionics computer can have 3 operating modes: pass-thru (no computer stabilization), accelerometer (leveling attitude), and gyro (holding attitude). But the pass-thru(manual) mode is not operable for the main rotor as shown in this video.
tilt right and backward - 0:01
attitude mode to rescue - 0:02
tilt right and forward - 0:03
 to attitude mode - 0:04
 tilt left straight - 0:05
attitude mode - 0:06
tilt backward - 0:08
attitude mode - 0:09
tilt forward - 0:10
 attitude mode - 0:11
 landing approach too high - 0:25
backing off far and fast - 0:35
good landing approach - 0:40
 touch down - 0:53
So, the OpenTX transmitter should engage in a stabilization mode before liftoff. 
The problem of erratic, forceful PID Integral over-correction (winding) is common throughout nearly all helicopter avionics computers. An example of the same problem is with Blade230's AS3X; in the video on the right, during the spool-up, the error rolling to the right is at 0:14. This is because the PIDs are tuned for flying in the air when rotor RPM is sufficiently high, but the ground contacts force the craft attitude out of the planned aviation envelope when the spooling-up rotor RPM is too low to correct in time. To overcome this problem, we cancel the PID process and use pass-thru-manual mode during rotor spool-up. The spool-up RPM should be controlled directly by the pilot by the throttle proportion on channel 5 to ensure safety, and the pilot's control with the stick should only be relinquished and set by the fixed RPM with the pilot's explicit input on channel 6 switch, even when the throttle position reaches full speed. The spool-up options note discusses the reason for this channel switch assignment and the substitutes. The spool-up throttle channel setup is pictured here on the right. 

To solve the problems of the previous two paragraphs together, we configure the avionics computer to give the pass-thru mode a channel switch, and this channel switch for the pass-thru mode is tied to a constant negative collective pitch. The negative pitch prevents a takeoff while the pilot spools up the rotor with the CV1 curve. In blue bars, we highlight the disabling of the accelerometer and/or gyro sensors. The flesh color underneath all aviation modes is for the same set of PID coefficients throughout all modes.

To convert the fraction system to the avionics computer's PWM timing system, Betaflight/F7 needs to anchor the endpoints to the nearby 25 points of the 1000us-to-2000us range, which is the range the OpenTX can produce after 98% scaling of 989-2011us.

To reduce pilot/operating error, we should consistently use all these modes on both the avionics computer and the three modes on the transmitter. There is no such thing as a reliable, field-improvised easy transmitter setup, as the following 2 paragraphs discuss.

When the first mode does not set the collective pitch to -23(that prevents liftoff) via an extra channel one mixer page in a faulty improvised setting, the pilot may forget to switch channel six to the middle position when attempting to reduce time to takeoff to save battery life in the midst of enabling video recordings and operating other equipment. The result is forceful crashes due to the high power applied for takeoff and the high-speed drift of the manual mode. The video of such a crash is on the right.

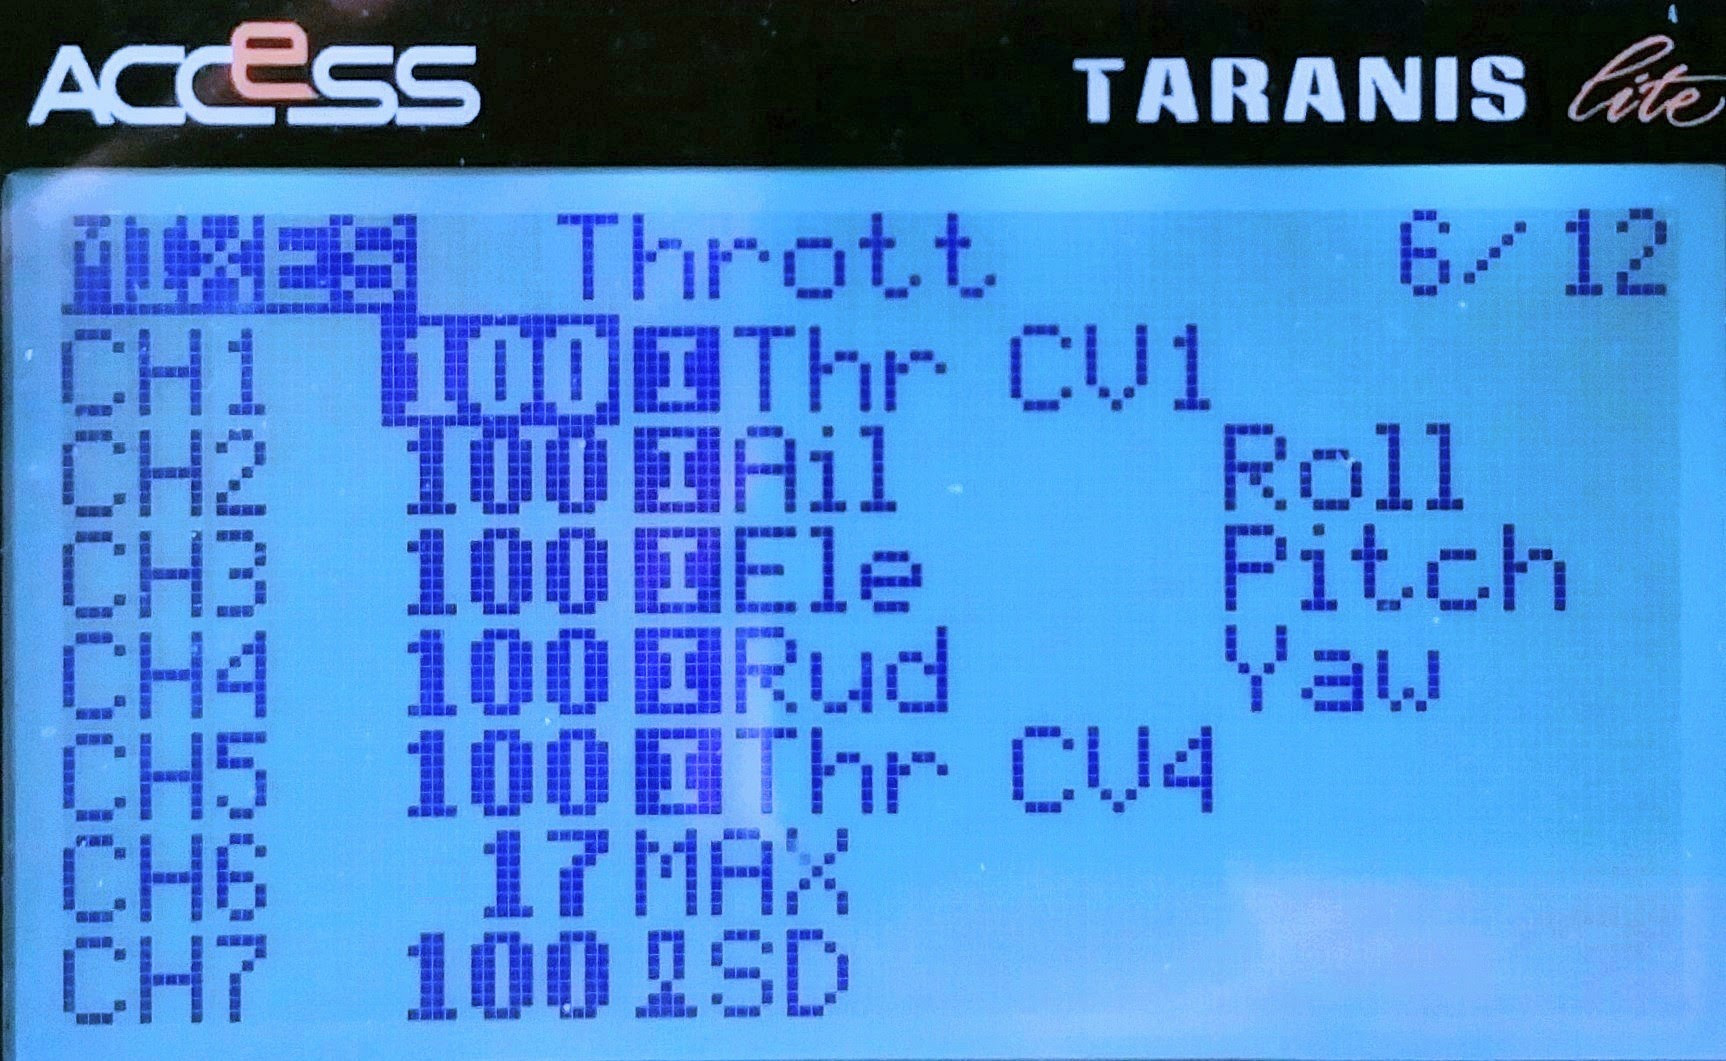
When the transmitter and avionics computer setups are improvised out of sync, the takeoff can happen in gyro-only mode. This happens even after a hand-tethered hovering test because the gyro-only mode hovering can be successful without the pilot knowing that the modes are out of sync, for that gyro-only mode does have stabilization characteristics. Then the actual takeoff will, again, crash badly due to the high craft momentum nature of the gyro-only mode. The video of this gyro-only mode takeoff is on the right. This field fault occurs when we are tempted into setting a single 2-position switch on Aux2-channel6 for a cruise-only mission. In the field, the PWM for profile switching appears to need more than 33%, say 40% or 50%, weight to expand over the 1/3 spool-up region at a low position. And that is true for a 2-position switch, but Betaflight would interpret the high position (2000-1500)*0.4+1500=1700 in the gyro-only setting because the weight scaling is centered at 1500, not 1000, as depicted in the diagram on the right.

How about tying stabilization mode to arming the craft in the avionics software? The problem with the tying is that abruptly powering off the RF transmitter (to conserve battery or to avoid accidentally activating stick commands) prevents returning to manual mode for swash plate level checks. Checking swashplate leveling is needed after each hard landing with servo clutch slip, which can be needed frequently, and hence repowering up the RF transmitter just to disarm complicates the work procedure and frustrates operators.

Betaflight is not replaceable with iNav avionics software: Our production build of the converted AIoT kit has a servo order per iNav avionics software, pictured here.


The HGLRC F722 Zeus Mini (20x20) can run either custom iNav or official iNav 8.01 software. The Walksnail OSD data works correctly with iNav 8.01 official software, as pictured here.
However, neither software allows "resource remapping," assigning the LED strip signal to the main motor ESC, as iNav is well-known for not allowing remapping. The iNav is not a viable substitution because there are no 5 physical signal outputs with the Zeus Mini board. As shown in the screenshot above of iNav 8.01 official software's resource section, the 4 servo ports B00, B01, B04, and B05 have physical solder pads, but the MOTOR1 at B06 pin does not. The pin B06 has no physical output as evident as motor 7 in default configuration in the default Betaflight software installed in the Zeus Mini because the physical output bus connector only allows 4 motor signal wires. The reason the motor is at the 7th output signal wire is because just above the first picture of this section is the plane's engine signal 7, depicted as s7. But, even if it were programmed as signal 5, it sill won't fit into the 4-signal-wire bus connector.
 
The custom iNav avionics software should not have any servo output. The heavier 30x30 HGLRC F722 Zeus might have 5 physical signal outputs, but its weight approaches 9 grams. 

Motors: Use Multi-Rotor ESC Software For Fast Response

Endurance prototypeRacing prototypeConverged production
Main motor size400440042806
Main motor RPM264031003250 or 3430
Main rotor diameter18.6 in/472mm18.6 in/472mm16.1in/410mm
Li-ion Battery3 or 4 in series3 or 4 in series4 in series
Main motor softwareMAINMAINMULTI
Tail motor softwareTAILTAILMULTI
Main motor governorCompensation with
collective pitch
Compensation with
collective pitch
BLHeli governor or
Betaflight Vbat compen.
Avionics softwareCC3DCC3DBF4.5.2
The converged AIoT kit includes 9 computers (9 CPUs), 1 Raspberry Pi CPU, 3 servo PID control CPUs, 2 ESC motor control CPUs, 1 GPS CPU, 1 F722 avionics computer CPU, and 1 RF control receiver CPU, each with its own software. A comparison of the prototype and production builds is in the table on the right. 
The endurance optimization chapter optimized the prototype power plant for racing with a 2806 motor with a 4-series (13.6+ volts) battery and 180 mm blades. According to airfoiltools.com data of the Joukowsky airfoil that has motor heating inline with the prototype NACA0015 blades, the production build uses the optimized setup. The motor heating at an extraneous collective pitch is just as good as the prototype power plant.

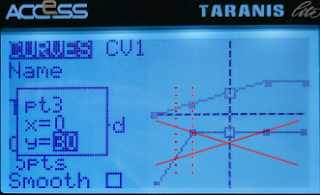
In prototype builds, it was not obvious whether fixed RPM will be required during takeoff and landing. The CV1 spool-up throttle curve picture on the right is super-imposed by collective pitch curve, and the 2 curves were simultaneously in effective with build test hovering. The test showed that the region between the 2 red dash lines had tail punches (yaw turn to the right), indicating insufficient RPM brought on by variable RPM configuration. So, the production build is determined to require fixed-RPM with ESC governor for both takoff and landing, not with the spool-up throttle curve.  
The question was which software among MAIN, MULTI, and TAIL to use with variable RPM in-air. And, MAIN code with the RPM governor disabled, resulted in a RPM change delay of roughly 3 seconds whenever throttle-up and resistance were detected. That meant when the protype craft descends too fast approaching an obstacle, I couldn't punch up the craft immediately because the ESC senses blade foil drags with throttle-up and gives small increments of torque over 3 seconds to prevent damage to the helicopter pinion/gear. There is no resistance reduction gearing in the gearless helicopter setup of our converged AIoT kit, so the ESC needs to apply the torque regardless of resistance, just like a multi-rotor system. The answer is shown in the BLHeli ESC assembly code, which indicates that the MULTI code is simpler/cleaner, without torque detection, and should be used in our AIoT production build.The assembly code shows that MULTI code has all the MAIN code functionalities, including fixed-RPM governor, without the unwanted spool-up torque detection, and that MULTI code has all TAIL code functionalities except the unneeded idle spin, and hence the MULTI code should be used for both the primary and tail rotor of converged AIoT builds. 
To configure the ESC, we use the generic F722 Betaflight 4.2.5's passthrough USB-to-UART connection program with BLHeli Configurator Chrome WebApp. Betaflight versions newer than 4.2.5 often have bugs in the PWM protocol ESC passthrough, and version 4.5 completely removes the passthrough. Betaflight 4.2.5 binary hex file for the F722 CPU based avionics computer boards is betaflight_4.2.5_STM32F7X2.hex, downloadable here.
For the pass-thru program to work, the MOTOR 1 pin needs to be temporarily assigned to the SERVO pin of the tail motor(SERVO 4 in CLI), while the 4.2.5 software is not supported by the latest Betaflight configurator GUI. This means loading the dump_all config file into the CLI terminal (which is supported despite the GUI being unsupported) to do the "resource" reassignment commands and the "save" command. This also means forcefully running a "save" command after loading the dump_all config because there are command features of the version 4.5.2 software that are not supported by 4.2.5, and multiple errors occur during the loading of dump_all. In the above screenshot, the Betaflight software version is reloaded for configuring the ESC properly, but the resource reassignment is wrong, servo 5 instead of servo 4, and the result is the failure in flashing the ESC software, screenshot here. This means that the signal wire needs to be resoldered when flashing ESC software to the servo 4 lead.  Safety precaution dictates that motor power with ESC battery should be applied last after all connections and software are set up, and motor power should be the first to be torn down after any configuration/software flashing. With that in mind, power only the avionics computer by connecting a micro USB cable, start the BLHeli app, and click "Connect" with the default baud rate and auto-detected tty port. The computer now reboots into the USB-to-UART adapter program. But, wait, there is sometimes a 1-minute delay for the reboot to occur if the BLHeli program determines that the Internet connection is available but the software website is unreachable, so the best is to ensure Internet access of the laptop PC. Now connect ESC's craft battery power, then click "Read Settings" to connect to the ESC computer. If the "Read Settings" button is unavailable, it is still in the 1-minute period. After flashing ESC with motor software, remove ESC's craft battery power plug first as a safety precaution. Then tear down software/other connections. If you don't tear away the power, when the program switches back to Betaflight software, the motors will spin up to compensate for craft orientation or to match any unintended RF transmitter command signal, posing a great danger.  The prototype "compensation" throttle setting for a specific motor, case-by case, is not applicable for large-scale deployment with varying hardware. The solution is to use ESC's RPM control PID governor or (future) avionics computer automatic Vbat compensation. I-Gain needs to be high at 3.00 to track RPM precisely. P-Gain at 0.5, to prevent motor governor oscillation. The governor in the MULTI software doesn't detect torque and has a much shorter acting time than 3 seconds. The entire configuration is as screenshot here. 
The latest, and last BLHeli version is v14.9, and the correct main motor RPM control gains (P=0.5, I=3), startup power (1.25), and damped off were determined during the endurance 
optimization building to reduce heating and prevent RPM collapse.

The production build uses Favorite LittleBee 20A Opto because the substitute DYS SN20A, as rebranded as Blade-Thrust, has multiple issues, such as this screenshot here, that need software overwrite.
With a software overwrite with DYS SN20 MULTI software version 14.9 (latest and last BLHeli version from opensource github.com, also downloaded here https://drive.google.com/file/d/1VR40QiSTiCpBNoLuRfzF2tX-r1SYDhEg/view?usp=sharing, https://drive.google.com/file/d/1VRZuM9waIJCqShnFd6Oaq3NoW2o6_C_5/view?usp=sharing), the ESC's life span is shortened to about 5 power cycles, resulting in short circuit (danger) or MOSFET failure.


The 4.2.5 software does not have the one-click-installation feature to allow the installation of our production build's 4.5.2 software. 

Flashing the avionics computer software after downgrading to Betaflight 4.2.5 requires putting the avionics computer into DFU mode with the depressed physical boot button before plugging in the USB cable to the configurator computer. And the DFU mode requires removing the RF control receiver according to the following video, or face USB failures as pictured here.

So, once you finish using 4.2.5 software and are ready to move back to 4.5.2, use the bootloader button on the Zeus board to enter DFU mode, and then install the 4.5.2 software with the "No reboot sequence" option, as pictured here.


With the ESC motor RPM PID control software component, called the "governor" for short, the craft with the 12-pole production motor needs 3250 RPM / ( 50,000RPM / 7 ) x 200points - 100points= -9 points level in the -100-100 scale of the transmitter. The 50,000 max RPM is seen in the above GitHub page of the ESC source code. 1/7 fraction is attributed to the multiplication of the 14-magnet brushless motor compared to the elementary 2-magnet motor.  The main motor ESC calibration is performed in the 
Betaflight configurator GUI. Channel 5 is mapped to "Servo 6", counting up from 3 main rotor servos from 2, "bypass" checked in the GUI. In the CLI's servo section (not the resources section and not the smix section), the fifth channel is specified as the channel "4", counting from 0th in the last parameter. In the GUI, the 5th checking column is checked for "bypass," for Servo 6 only.
Calibration, configurator needs tentative(first click Live mode and don't click Save in the GUI) Servo 6's MIN set to the high position of 2000. The tail ESC is "Servo 5" in the GUI.
The tentative MIN position only takes effect after you click Enter or click on a different field in the GUI as shown in the screenshots above. The scaling is finalized when setting back to 1000 to save the calibration.
The motor is not configured as a motor in the mmix section of the dump_all. The motor can not be controlled with Motors GUI because Betaflight motor mmix is tied to throttle channel T, a collective pitch channel in our AIoT build, after all other substitutes were ruled out.

Here the 200-point RF control (2000-point ESC control) calibration is assumed to perfectly corresponds to 1000us to 2000us RF transmitter PWM output, and if the RF transmitter uses the 989us to 2011us range, such as Frsky's X9 Lite or QX7, the RF transmitter needs scaling the channel by (2000-1000)/(2011-989)=97.8%.  

 A momentary tail reset became frequent after changing the motor from a prototype test build's 1306 (with oblong-shaped props) to 1303.5 and 1106, and also the change of ESC software with a different default startup power, as shown in the video on the right. Notice that the heading is the same at 0:07 and 0:12 . The tail motor spins down at 0:07 when torque suddenly lowers down or when the wind blows from the side onto the tail fin/prop creating artificial counter torque. At 0:08, the tail motor can not spool up fast enough, and the deviation between the expected and actual heading is too large. At 0:09, the tail PID resets, allowing a (unintended) 360-degree turn. At 0:12, the tail spools up successfully.

Research by SiieeFPV here shows that there is no definitive trend of startup power and stuttering.

So, the solution for the tail reset is not a particular startup power. But it was the most documented configuration with the production 1303.5 motor during extreme robotics build with tail ESC's startup power at 0.5 for startup without delay and without stuttering. 
The configuration for racing for the tail ESC is the rightful solution for the converged AIoT, shown in the following screenshot and video. Damped off as required to prevent ESC overheating in summer, and is the only tested and documented setting.

This also enables the Low RPM Power Protection feature to protect the ESC in case of a crash when the propellers are stopped by the ground or other solid objects.

With the production dump_all PID configuration, the production build's tail reset is infrequent and needs deliberate efforts to reproduce the tail reset problem, as in the following 2 videos. 

Yet, another question is whether the Low RPM Power Protection feature is detrimental to the quick spinup. And our testing in the following 2 video footage showed that the Low RPM Power Protection feature is irrelevant when the propellers don't hit a solid obstacle, only spinning up the motor mid-air.


Collective Pitch Curve For Fuel Economy

The endurance build and extreme robotics build investigated why the prototype NACA0015 blade's PIDs and collective pitch curves can be directly transplanted into the production build with a different airfoil, as well as the subtle differences. Here, we set the pitch curve identical to the prototype build when operating the pitch curve from the common PWM signal 1000us to 2000us.
All credit and copyright of airfoil data belong to airfoiltools.com , NASA, and Xfoil , for the following picture.


Prototye rotor RPM for level hovering is 2640/minute = 44/s . Rotor diameter 0.48m , speed at 3/4 blade span is 0.48m x 3.14 x 44/s x 3/4 = 50m/s . Our Reynolds number is 50m/s x 18mm / 1.46 x 100000 = 62,000 . So, between the light brown and green curves, but closer to the light brown curve, is our curve for attitude-accelerameter mode.

 
For simplicity of collective pitch angle calculation, we choose servo arm length identical to blade pitch lever length, in the prototype build, 12 mm pictured above and on the right. The  Oxy2 Sport grips and the Align 250 grips have congruent geometry as shown in the picture above. When all 3 pillars of the swash plate are raised evenly, the blade lever and angle are congruent to the servo arm and angle. The angle of travel of the RF control PWM 1000-2000 µs is 83 degrees in the above picture and 84.6 degrees in another test with the avionics computer PWM 1000-2000 µs, averaging 83.8 degrees.

As tested by FlightPoint, the angle of travel of PWM 989-2011 µs is 85.4 degrees, as pictured here.

For the prototype optimal lift-to-drag ratio blade pitch 6.25 degrees,  servo arms also rotate 6.25 degrees. The full range angle of the EMAX 9501 for 1000us to 2000us PWM is 83.8 degrees. 6.25 degrees / 83.8 degrees x 200 points = 14.9 points. To fit the PWM with our swash plate mixers here, we double the hovering points because most avionics computers allocate 50% swash travel for collective mixing. So, the prototype used a straight line for the collective pitch curve from 0 to 14.9x2=29.8=30 points at mid throttle stick. This angle and set point are optimal for cruising for the production build's Joukowsky 10.5 blades. We stipulate the collective pitch to 3/4 of the throttle stick to avoid straining and overheating motors that have mislabeled KV. We use the servo sequence, the first servo on the front, the second on the right, and the third on the left, when looking down on the craft from above the craft. With Betaflight, servo 0 and servo 1 are reserved as pan-tilt servos for camera, so, the servo numbers start from 2 for the first craft servo.


Also in the -50 mix lines, the source 0 and 1 are stabilized roll and pitch respectively. Source 7 is throttle channel 1, not an aux(source 8+). The problem of assigning collective pitch control channel to Aux is that avionics computer TPA(Throttle PID Attenuation) and TPS(Thrust PID Scaling) only corresponds to throttle, not AUX. The consideration with throttle input channel 1 in TAER being recognized as the throttle means arming for throttle position should not near 1500us to avoid stick function commands. After considering all substitutes, the arming is set to have a large negative collective pitch for low throttle. This large negative collective pitch is set as the inverted hovering pitch angle for racing RPM, which is -23 points, or 1500-23/200*1000=1385us. The F7's min_check=1385us can mislead us to think that a hypothetical RF calls for -57 point of 1215us collective signal will be conflated to 1385us in F7 setup, but F7's signal 7 is raw RF signal, not processed nor conflated. 

TAER is considered "american RC" by Christian Rauch in the MSP C++ code https://github.com/christianrauch/msp/blob/master/src/FlightController.cpp

The production craft's servo mixing is larger than the prototype craft's because the servo arms are shorter relative to the blade pitch arm width, the p-value in the following diagram. The high mixing also allows the overshooting of the servo-throttle to avoid avionics software startup cyclic "rapid twitch" discussed in the build notes https://nocomputerbutphone.blogspot.com/2018/09/converged-iot-platform-build-notes.html.  

The relationship between servo mixer attenuation and servo/swash/pitch/DFC arm spans is illustrated here.
Because the prototype's servo mixing used standard CC3D 50%/50% collective/cylic mix when the p value was 1, the extra attenuation of production build's p value at 1.5 means the production build's collective mixing, if and we do want prototype's throttle curves reused in production build, needs to compensate the 50% mix by the factor of 1.5, 50% x 1.5 = 75%.

Because the prototype's cyclic mixing occurred with p*(d/u)=1*(1.833/0.916)=2 while production build's p*(d/u)=1.5*(2.25/1.1875)=2.842. The extra attenuation of 2.84/2 = 1.42 is compensated as 50% x 1.42 = 71%, and (50*sqrt(3)/2)% x 1.421 = 62%.

Because we compensate the mixer difference in software, the pitch curve calculation in RF hardware controller based on the 50%/50% mix does not need recalculation.

The endurance build notes show the measurements of p, d, and u, where lightweight substitutes were considered

All these production-improved settings are part of the dump_all file in the  operating notes.

The prototype's optimal lift-to-drag ratio pitch angle doesn't mean the overall motor-propeller-battery combination is the most fuel-efficient, but just the propeller optimal. The production build is optimized for overall fuel efficiency and uses a 6.0-degree collective pitch for cruising. The production build's servo arm length is 2/3 of the grip pitch arm width, which attenuated the collective pitch by the same fraction, so the dump_all has an allocation of the swash movement needs to be exaggerated by the inverse of the fraction, 50% * 3/2 = 75%, as the following 3 lines, 
smix 1 2 7 75 0 0 100 0
smix 4 3 7 75 0 0 100 0
smix 7 4 7 75 0 0 100 0
. The production build has collective pitch curve points 0, 15, 30, 45, and 45, same as the prototype build. The production build's first servo is on the back, the second servo on the left, and the third servo on the right, by the craft's own perspective.

The production build's RPM 3250 is inherited from the prototype with 193mm blades of endurance build note with 193 mm blades for neutral buoyancy at 6.2 degrees of collective pitch that is optimal for in-place hovering, which coincidentally is the optimal collective pitch for cruising of the production build at mid throttle stick. But RPM 3250 itself is not optimal for cruising. Instead, RPM 3250 coincidentally is optimal for production build neutral buoyancy at 5.47 degrees optimal collective pitch. What this means is that when the craft reaches neutral buoyancy after takeoff, it also reaches the optimal fuel efficiency for in-place hovering. When you raise the throttle collective pitch stick to mid-stick, the pitch is at optimal cruising fuel economy, but you need to lower the RPM to prevent climbing.

This also means that if you want to experience mid-throttle-stick-means-neutral-buoyancy, simply swap the blades to 193 mm with NACA0015 airfoil and 18 mm chord length of the prototyp(II) build.

Swashplate Setting 


One out of three purchases of the swashplate requies 2 loop strands of Kevlar inserts to fill the slop gap between the swash ball and servo rod socket, to prevent pitch trap instability, discussed here https://nocomputerbutphone.blogspot.com/2018/10/oxy-210-blade-characteristics.html. If, after checking that the inserts are working correctly, the craft still suffers from unmanageable altitude swing, replace the swashplate because an old swashplate with many crashes is loose and has an unacceptable slop gap.


For swashplate leveling, our spool-up is performed in manual mode. If the swash banks to one side of the craft, there is no PID correction by the computer and no heavy battery or long tail lever on the sides of the fuselage to counter the tipping. Use a zip tie with the half-cut end, as shown in the below picture, to check that all 3 pillars nearly touch the servo linkage. This zip tie should only be used after checking for enough room between the swash and the hub after booting up the avionics computer.  

It is well known that servos accept PWM range 1ms to 2ms, or 1000us to 2000us. But, the consensus is that manufactures specify margin of error of 150us between avionics computer and servos when viewed in BLHeli configurator. So, it is safe to give servos PWM between 1000-150=850 and 2000+150=2150. The spline count of the servo arm is 15; the servo arm travels 83 degrees for 1000us. So, each spline dial notch is equivalent of  1000.0*(360.0/15)/83.0=289us PWM change. The actual testing result is that 1 spline dial is equivalent of 310us PWM at the near center. That means that when attempting to set the high-end PWM to larger than 1660us, you could dial the arm position up 1 spline and increase PWM on top of 1660-310=1350us, which will set the high-end PWM closer to the central 1500us in the tolerated range.

When changing the servo PWM center micro-second value, the change should be multiples of 10us because it doesn't have the resolution of the full 1000 PWM points; instead, it only changes with 1/100 of the full range. Considering that the full range of the servo arm is 83 degrees, 1/100 of the range is 0.83 degrees. To center the swash plate, check the top of the blade boltings pictured on the right. Change all the 3 PWM center neutral values 10us at a time. 

Indoor Hovering With RF Receiver With Proximity Cutoff

In the following video, XM+ receiver's LED starts out green, the transmitter antenna is shifted to create stronger radio coupling with the receiver at 0:01. The cutoff occurs at 0:02, the LED turns red, fail safe takes effect. The camera moves forward to zoom in to the receiver. The movement inadvertently shifts the transmitter antenna again , weakening the proximity coupling.  The cutoff is released at 0:07, and LED returns to green.


To avoid mid-air failure, the FrSky XM+ receiver requires putting transmitter on "range testing" mode before hovering in close proximity. This is not needed with Crossfire or R9M receiver, which does not have proximity cutff.  In the prototype, the receiver sits on the pedestal as appropriate for the small, geared motor under 22mm diameter of stater, spaced across the cage. In production, when 4004  direct drive motor is used center in the cage, the receiver signal is severely jammed by the spinning motor. So, production build does not use the pedestal.


Takeoff Procedure With Safety Checks

Motor bolting failure in-air has the same characteristic left turn, resulting in twisted tail motor wires and missing bolts after recovering the wreckage. The tail wreckage of such a case is pictured here on the right.

The takeoff procedure for the prevention of mechanical failures follows.
    1. DFC bolts marking on the installed position. Twist the tail motor and tail props to see no loose screws.   
    2. Plug in the craft battery. Check the rough zero pitch and level of the swashplate. If the servo arm clutch is sprained during the last mission or handling, dial it to correct it.
    3. Position the craft on the takeoff surface with friction that prevents it from sliding. Remember, during the spool-up of the main rotor, there is no counter-torque compensation unless the tail yaw is applied manually. The blades should not scrape grass or thin twigs on the ground because the initial spool can bend the foldable hinges, throw the rotor off balance, and sprain the servo arms. 
The following steps show the OSD percent display of channel 1 throttle in a video clip for illustration only. Our base build does not require OSD; RF control transmitter LCD is. The corresponding RF control transmitter LCD point displays are next to the OSD percent. 

 4. Leave the craft and power on the RF control transmitter. The video above shows that the collective pitch changes from neutral to -4.8 degrees at 0:00 when the LCD display point of channel 1 throttle changes from 0 to -22.5. The throttle percent shown at OSD goes from 18 to 0. The 0 percentile display refers to the PWM signal at min_check from the RF transmitter, which is a negative collective pitch. The 18 percentile display refers to the actual neutral zero collective pitch at 1500us in the scale from min_check = 1386us to 2000us.
    5. Arm the craft. This occurs at 0:00 of the video.
    6. Spool up the main rotor slowly to the hovering RPM at 2/8 stick, as seen in the above video from 0:05 to 0:17, reaching the top red line of the soil color region in the table on the right. Slowly make the spool up so that the craft doesn't capsize due to an unbalanced rotor with folded blades. Then the craft should have no movement after the shaking because the friction of the ground overcomes the main rotor torque, and the negative pitch lift force presses down the craft firmly on the ground. 
    7. Switch on stabilization attitude mode with the throttle stick at 2/8 position, as seen in the above video at 0:18. The collective pitch will suddenly become positive 3.4 degrees, as shown as 14-15 LCD throttle point, also shown as 30 percent in the upper right OSD of the video. The craft will swing for a few seconds for computer stabilization to settle.
    8. As shown in the video, raise the collective pitch to 3/8 stick from 0:18 to 0:24. The craft will stay on the ground.  
    9. Raise collective pitch toward 1/2 stick slowly; craft will reach neutral buoyancy between 3/8 and 4/8 stick and lift off at 25.5 throttle LCD display points or 39 percentiles shown in OSD, as shown in the video from 0:24 to 0:27.
    10. If the drift is acceptable, raise the collective pitch to mid stick 4/8 at 29.3 throttle LCD display points, or 42 percentiles in OSD. The climb starts. At this point, the collective pitch is at the most fuel-efficient angle for level cruising as verified in the endurance build. To benefit from the fuel economy, start the forward movement of the craft to reach the optimal configuration.

Overall, the craft flies in the blue sky color region of the table on the right and stays on the ground in the green grass color region. 

Reduce Trimming From RF Control

The Takeoff Procedure shows rolling to the right when switching to Attitude mode due to the required 4-degree tilt (align_board_roll = 4 in dump_all config) of the helicopter hovering physics. The RF control has a small right-roll trim. The rolling and self-correction don't need pilot input to correct. However, some builds may need a 5-degree tilt. If the avionics computer configuration is off and the roll trim is large, the RF control trim will cause more rolling than shown in the video and can be a risk for tip-over.

Accidental Manual Spool-Up Mode

The negative collective pitch of the spool-up mode with tailspin somehow results in near-perfect craft inversion. In the footage on the right, the accident occurred at 0:05 during hovering with a hovering throttle (collective pitch) in attitude mode. The recovery is flipping the mode switch to attitude mode, keeping the same throttle (collective pitch) at a hovering level. The altitude drop from the corrective action of flipping the switch to attitude mode to stabilizing altitude is 6 meters.

Failsafe Setup

With all-default settings, when more than 0.15 seconds of RF signal loss, the procedure of DROP the craft enters. The craft will drop to the ground if nothing else happens. When the RF signal resumes, the first 0.05 seconds of the signal is considered dirty and discarded. If the failsafe sets arming status to disarmed, it would require lowering channel 1 to lower than min_check when flipping on the rearming switch. So we set the arming status to armed during a failsafe. So the craft recovered successfully without the main rotor's slow spool-up nor flipping any switch on the RF control transmitter, as tested in the first video footage, which disconnected the ribbon cable between the RF control transmitter and the TBS Crossfire Mini module. 


Summary RF Control Setup

In gyro-only mode, the accelerometer is not used, and the outer loop calculation of PID in avionics software is zeroed, so the RF control's trim from the transmitter handset is inappropriate. And so, the roll and pitch RF control mixer should have 2 separate pages for each axis, one with trim, another without trim.

To summarize, with all substitutes rejected, the montage of 25 screens of created/edited pages are here below. Navigate-thrugh pages without needing to modify the page are skipped here. 


The above cell avoids mixing disarming channel 7 into
a motor cut so that accidental disarming does not cause motor jerking when rearming


The 26 pages don't need to be set up at once. For a hand-launched hovering test, one single mixer page on the left is all that is needed to map an RPM curve and a throttle pitch curve, and add an arming channel mix. As pictured on the left, the bare minimum pages serve as the first page for each channel's mixer, allowing the craft to continue building to its full capabilities. In the absence of channel 6 aviation modes, the default middle 1500us is presumed in the avionics computer, which assumes the accelerometer-stabilized mission.

Balance The Rotor Or Tip Over On Takeoff 

As seen in the video explanation on the right, vibration can result in seemingly deliberate mechanical movement that produces erroneous attitudes by the micro-electro-mechanical gyroscope during takeoff.
The building step of trimming the feathering shaft discovered that the feathering shaft slop contributes the most to a rumbaling unbalanced rotor. When the slop is larger than 0.2 mm, the infinitesimal imbalance shifts the feathering shaft to either side of the blades after spooling up, and the direction of the shift is unpredictable and only observed after spooling down. When the feathering shaft's centering slop is less than 0.2 mm, the balanced rotor with smooth hissing can easily be achieved with thin, clear tape squares of 1cm sides.


So, what happens if the rotor has longitudinal off-balance by more than 1/100th of a gram in the field? In the videos below on the left, with perfect balancing, the PIDs are 2 notches lower than required because the swash slop is 10mm, the largest. The dive loses its heading hold about 2 seconds before punch-up at 0:11, but video stabilization patches up the insufficient PIDs below on the right.
  But, when a 2 square-cm balacing tape is intentionally removed and immediately performing another test, the dive has loss of heading hold at 0:08 and 0:09, and the stabilization result is sub-par, with blurring at 0:07 and 0:09, to the above good video.
  When inspecting the gyro data, both good and sub-par dives are 11 seconds between 2 green pitch-up dips in the following 2 pictures. The first picture is the good dive; the second is the sub-par one. And the blue-band noise level of the sub-par dive is about twice as thick. The good dive has a long period of quietness between 05:49 and 05:55, while the sub-par one has no quiet period.


Make Rotor Stiffness Consistent And Balanced For Stable Video

A prototype with overly loose grips that draped before turning the craft to the side 90 degrees, as the video below on the left shows, was recorded to have off-standard PID settings, as in the video below on the right.
For consistency, we set the drape at 90 degrees as the "standard" because we don't have a consistent gauging method. 

When blades are overtightened slightly, the mast bumping is noticeable as shown in the following video comparison table.
Stuck Blades At 90+ DegreesBlades Drape At 90 Degrees
Raw video has mast bumpings during a dive

Post-stabilization cannot fix the mast bumping
Immediately after loosening the bolting

Post-stabilization results in undetectable bumping


Change Rotor RPM With Locale/Weather

According to the NASA education page screenshot below on the left, density affects blade lift linearly; in the screenshot below on the right, the lift is proportion to RPM to the square power. Using binomial approximation, blade airspeed RPM should be adjusted by half the percentage of air density change with weather reports.
Overclocking RPM can cause craft instability and/or vibration because the avionics computer PID gain is tied to rotor angular momentum and proportional to rotor RPM.


Our reference condition is the middle of the Fahrenheit scale of 0-100, 50 degrees Fahrenheit, 10C temperature for RPM 2643 at 27 throttle points in the -100-to-100 points scale of the 1000us-2000us PWM signal range. Weather, temperature, and pressure can change air density from normal conditions by 11%. For example, a typical winter temperature weekly low of -10C produces air density 293.0/(293-20-10)=1.11 times the reference air density around Boston suburbs.  Barometric pressure generally does not affect air density as much as temperature; for example, a 13% pressure change from 30 inHg to anything below 26 inHg would approach world records for the eyes of an intense cyclone. On the other hand, locale consideration for elevation, many cities above the elevation of 3000 feet, such as Tucson, northeast of Los Angeles County, El Paso, Denver, can reduce air pressure by 11% by altitude. However, the simple square relation doesn't consider turbulence effects with Reynold's number, and the simple square relation consistent for both drag and lift in response to blade speed change would contradict the deviation of Cl/Cd ratio curves when Reynold's number changes. The effect of blade speed is more powerful than the second power proportion because the higher the blade speed, the higher Reynold's number and the higher the Cl/Cd ratio. So, we will use a spreadsheet table on the right for RPM adjustment, approximating the blade speed effect to the 2.5th power.

AI Shahed Tracking/Intercepting

The converged_aiot executable in the converged_aiot.tar.gz package uses the very popular christianrauch/msp to command Betaflight on roll/pitch/yaw setpoints. Currently setting the roll/pitch/yaw attitude to neutral level, hovering, while the video streaming continues in a separate thread in the main program. 
The converged_aiot.tar.gz package also contains a C++ program yolo11_demo_linux_a733 (given by Allwinner Model Zoo SDK but engineered to work with Radxa's system OpenCV and system GCC in the make.sh below) that uses YOLOv11-Standard to recognize objects; as such,
radxa@radxa-cubie-a7z:~/awnpu_model_zoo-v1.0.0-20260423-f562dd16/examples/yolo11$ rm -f *.cpp.o ./yolo11_demo_a733
radxa@radxa-cubie-a7z:~/awnpu_model_zoo-v1.0.0-20260423-f562dd16/examples/yolo11$ echo "  " >> main.cpp 
radxa@radxa-cubie-a7z:~/awnpu_model_zoo-v1.0.0-20260423-f562dd16/examples/yolo11$ source make.sh
$ export LD_LIBRARY_PATH=../../common/npuruntime/lib_linux_aarch64/A733/:$LD_LIBRARY_PATH
$ ./yolo11_demo_a733 -nb model/yolo11s_6_uint8_a733.nb -i model/dog.jpg
model_file=model/yolo11s_6_uint8_a733.nb, input=model/dog.jpg, loop_count=1, malloc_mbyte=10 
VIPLite driver software version 2.0.3.2-AW-2024-08-30
input  0 dim 3 640 640 1, data_format=2, quant_format=0, name=input/output[0], none-quant
output 0 dim 80 80 64 1, data_format=0, name=uid_11_out_0b_uid_1_out_0, none-quant
output 1 dim 80 80 80 1, data_format=0, name=uid_10_out_0b_uid_1_out_0, none-quant
output 2 dim 40 40 64 1, data_format=0, name=uid_9_out_0ub_uid_1_out_0, none-quant
output 3 dim 40 40 80 1, data_format=0, name=uid_8_out_0ub_uid_1_out_0, none-quant
output 4 dim 20 20 64 1, data_format=0, name=uid_7_out_0ub_uid_1_out_0, none-quant
output 5 dim 20 20 80 1, data_format=0, name=uid_6_out_0ub_uid_1_out_0, none-quant
nbg name=model/yolo11s_6_uint8_a733.nb, size: 6850488. 
create network 0: 13090 us.
prepare network: 2349 us.
buffer ptr: 0xaaaae93ae240, buffer size: 1228800 
network: 0, loop count: 1
run time for this network 0: 31237 us.
output 0, ptr 0xaaaae94da340, size 409600.
output 1, ptr 0xaaaae966a3c0, size 512000.
output 2, ptr 0xaaaae985e480, size 102400.
output 3, ptr 0xaaaae98c2500, size 128000.
output 4, ptr 0xaaaae993f580, size 25600.
output 5, ptr 0xaaaae9958600, size 32000.
post process time : 8 ms
detection num: 3
 1:  94%, [ 127,  129,  569,  419], bicycle
16:  92%, [ 132,  220,  311,  541], dog
 2:  49%, [ 466,   75,  692,  171], car
destory npu finished. 
~NpuUint. 
radxa@radxa-cubie-a7z:~/awnpu_model_zoo-v1.0.0-20260423-f562dd16/examples/yolo11$
TODO: With the publicly available Shahed loiter munition YOLO model, similar to https://zir-system.com/en/product/automatic-guidance-module-zir-ai-betaflight/, we need to integrate converged_aiot's fcu_thread with detected object screen coordinates, such as the above bicycle at [127,129,569,419], to steer the craft with setRPYT() function onto the recognized Shahed's trajectory. This will likely introduce a 50ms delay in the video feed.